DIY Home Telephone Wiring
A lot of people shy away from home telephone wiring. They may think that they are not allowed to touch the existing ones.
This is not so. Your local phone company will come and do your wiring for you, but it will cost you.
Wiring a jack is not difficult and it is totally fine to add a new jack or internet phone jack to your system.
You should disconnect the main phone line from the source before continuing wiring a phone jack. The phone line usually comes in by your electrical panel. There will be a small box with a phone line going in and coming out. This is called your "Connecting Block". Carefully remove the cover and disconnect the wires noting where you removed them from.
TIP: You can take a digital picture of the box so you can refer back to it when you want to re-connect!
When wiring a phone jack, you will notice that the wires are different colors. Here is a chart that defines the colors:
| Old Cable | New Cable | 2 Pair Connecting block |
|---|---|---|
| Red | Blue/White | |
| Green | White/Blue | |
| Black | Orange/White | |
| Yellow | White/Orange |
These instructions assume that you have already run the home telephone wiring to the new location. All you need to get started is a screwdriver, a pair of needle nose pliers and a wire stripper.
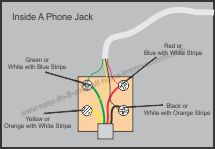
Phone Jack Wiring Diagram
Depending on how old your wiring is, you just need to match colors.
If you have the newer wiring, attach them as follows...
Ready to do your own home telephone wiring?
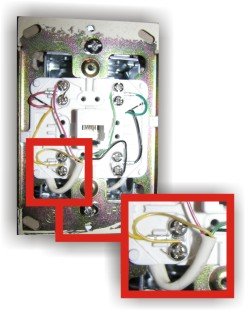
Use your wire strippers to remove about 1/2" of casing. Make a small "hook" in the wire with the needle nose pliers and place the wire under the screw. Make sure the wire is wrapped around the screw in a clockwise direction so it will stay under the screw when you tighten it.
Now that you have your phone jack wiring complete, you must now hook the telephone wire up to the connecting block.
Again, depending on the age of you home, the conecting block could be as simple as two screws. A red and a green. Connect the red wire (or blue/white) to the red side and the green (or white/blue) to the green side.
If you have a newer connecting box (I beleive they are called R66 Connecting Block or a 2 Pair Connecting Block) just find an empty pair of screws and connect the wires in.
NOTE: Line 1 is usually the only telephone line you need to connect (Red and Green). Additional lines would be need for a fax machine or second phone line (naturally)
Great! Now you have the home telephone wiring you have always desired. Once you have completed all your connections, it is possible you may have some problems. (Let's face it, no one is perfect!)
Here is a short list to help you troubleshoot your phone jack installation.
Static
Static could be from loose connections, a pierced wire or even if the wiring has been wet. Check all your connections carefully.
Dead Air
This is usually from a short in the phone wiring. Maybe you stripped too much of the casing off and the copper from different colored wires is touching. Again, check all your connections carefully.
Buzzing Sound
The phone wire may be too close to a power wire or touching some metal. Also check that all the colors are matched properly.
So ends the do it yourself guide to basic home telephone wiring. If you require something more complex, contact your local phone company for assistance.
Hey, doing it yourself is great but if you are unsure of the advice given or the methods in which to job is done... don't do it. This site is merely a collection of how some people do home improvements. There is no way we can anticipate every situation and we do our best to inform of any risks for each job. Be sure to check local building codes for proper installation and permits.
If in doubt, hire it out.
